How to Tag a Soldier
Once you've entered Tagging Mode by clicking on the Tag Soldier button in the lower-right corner of the Reel Viewer, you are able to tag soldiers. Tagging soldiers involves selecting the first and last images which make up a soldier's record, and then entering basic information about them, such as their name and the unit in which they served.
If you find that you made a mistake after tagging a soldier, you can always edit the tag or delete it entirely -- see the Editing Tags help topic for more information.

Step 2: Click the first image in the soldier's record
Step 1. While in the Reel Viewer, make sure that you are in Tagging Mode. If you are in Tagging Mode, the message "Tagging Mode: Click First Image in Soldier's Record" will be displayed in the upper-righthand part of the screen. If you are not in Tagging Mode, click the Tag Soldier button in the lower-righthand corner of the screen.
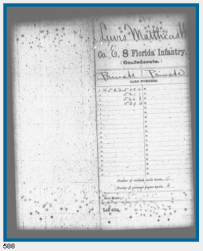
Step 2. Click the first image in a soldier's record. This will usually (but not always) be a Jacket Envelope such as the one shown at the right, with the soldier's name, unit and ranks) written at its top, along with a list of the numbers of the cards it contains. When you click the image, a blue border will appear around it, and the Tagging Mode status message will change to indicated that you've marked the first image in the soldier's record.
- IMPORTANT! Please DO NOT tag cards which are Reference Envelopes or Reference Slips. These are "special" cards which point to other soldiers' records, and they'll be marked separately at a later time. (Show me what these look like)
Step 3. Use the Transport Controls to navigate forward to the last image in the soldier's record. The easiest way to tell that an image is the last of a solder's record is if another soldier's record starts immediately after it.

Step 4: Enter the soldier's information on the Tag Soldier screen
Step 5. Click the OK button. The Reel Viewer will again appear, starting on the last image of the soldier you just tagged. This is to allow you to immediately continue tagging the next soldier in the reel if you wish.
If you finish tagging a soldier and realize later that you made a mistake, don't worry. While in Tagging Mode, simply click on any image in the tagged soldier's record and you'll be able to edit the tag or delete it entirely.

